Part of the magic of Hollywood is the apparent perfection, the effortless glamour. And like a real magic show, it’s all an illusion. Celebrities are people just like us, the glamour and perfection are all smoke and mirrors, an illusion, a vision, a projection to the outside world.
And as anyone knows, a magician never reveals their secrets. But today, I’m going to let you in on a celebrity style secret. Today, I’m going to show you how when your favorite A-lister is photographed “out and about” in just a plain tee shirt, they look effortlessly cool and somehow still put together, but when you try to recreate the look, you feel like you look like a bum.
The secret to the Perfect Celebrity Tee Shirt can be summed up in one simple word: Tailoring.
Nothing a celebrity is photographed in, on the red carpet or on the street, is off the rack. It is all (well maybe not all, but an overwhelming majority) custom fitted and tailored to be perfect for them by a team of extremely hardworking and knowledgeable tailors and seamstresses through the process of many fittings.
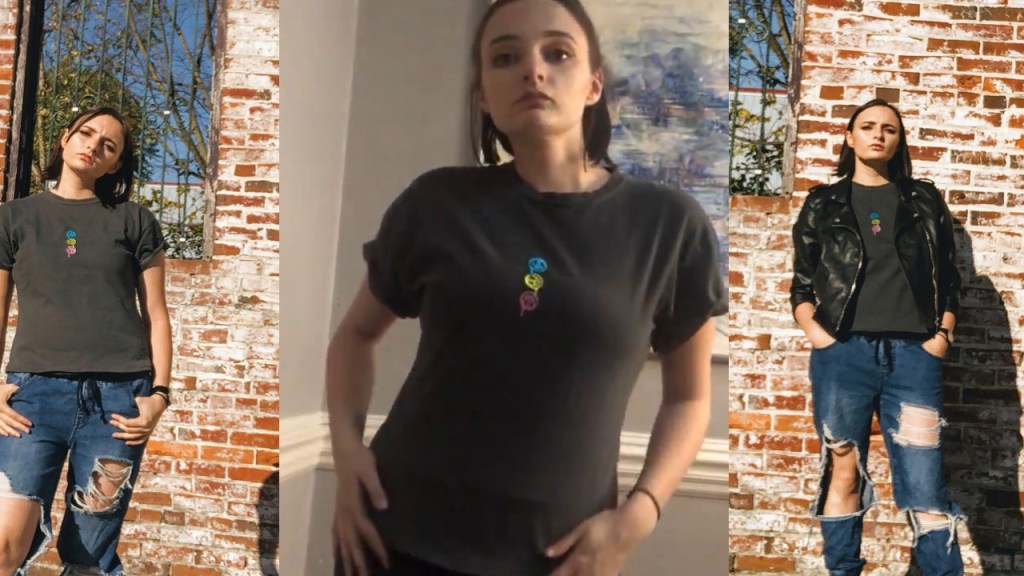
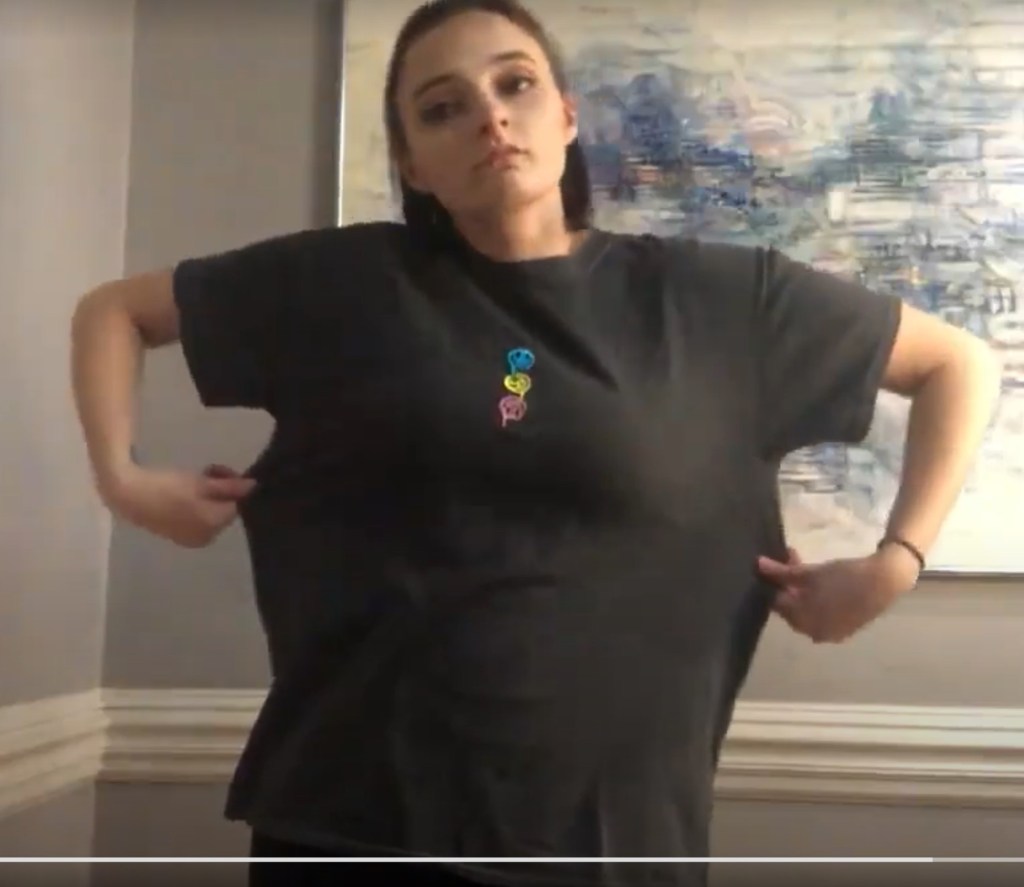
Read on to see how I took this men’s tee shirt (I bought it at Rue 21 on clearance for $7 and it was a size large) and used some Hollywood Magic (and a sewing machine) to make it paparazzi ready. And Check Out the Video of the Process here!
Step one: finding the shirt.
Since I will be using some basic tailoring on pretty much every part of the shirt except the neckline, I typically look for a shirt based solely on that, but these are the general guides I follow when choosing a shirt to make adjustments to.
- The neckline should fit comfortably and loosely over your head and sit flat against your collarbones and trapezius muscles (this tutorial isn’t for a deep v-neck or scoop neck style, just for your typical boyfriend tee).
- The shoulder seam should hit at least a half inch lower than your actual shoulder joint. Find this by raising your elbow slightly higher than your ear and feeling where the indent is on your shoulder- if it is more than half an inch below that, its fine, you just don’t want it higher.
- The bust should fit loosely over the widest part of your chest with no pulling/stretching or tightness.
- The hem of the tee should reach at least to the middle of your butt.
- In general, I’ve found that by ordering a shirt 1-2 sizes larger than my actual size, I hit all these marks pretty consistently.
As far as material goes, you don’t want something super thick for this, but a nice medium weight cotton jersey works well. A very fine cotton or jersey knit also works but is hard to fit because the material is so flimsy.
Step 2: Marking your adjustments.
Put the shirt on inside out for this part, since you’ll be sewing it, you want the seams to be on the inside of the shirt.
The general areas we will be adjusting are:
- Sleeve length
- Width of arm hole
- Tapering side seams/ shortening hem slightly.
- Narrowing the waist for better draping.
What works best for me is to work on the body of the shirt first, finish that, then work on the hem and the sleeve length after everything is fitted how I want it.
I start with the arm holes. To figure out how fitted they should be, hold your hand out straight and pinch the fabric where the side seam meets the seam for the arm hole, and move up slowly until your thumb is in line with where you can feel your pectoral on the front and your shoulder blade on the back- on me, this is about 4 fingers above the band of my bra, but depending on the cut of your bra and how broad shouldered you are, it may be a little different. (I like to place my hand flat against a mirror so I can see inside the sleeve and make this a little easier, but you can definitely do it by feel if you want) Pin from the side seam up to this area, then flatten the sleeve and pin to the end of the sleeve to make it fitted.
From there, we’re going to move on to the waist of the tee. This isn’t so much about fit as it is about what vibe you want to give. If you want a relaxed vibe, you might not even need to worry about this step- a relaxed look can be accomplished just through manipulating the hem and the lower side seams, depending on how big the t-shirt was on you to begin with.. But if you want a little more of a “J.Lo just leaving her spin class but somehow still looking amazing and not even tired” snatched waist look, just pinch in the tee at your natural waist (about an inch to two inches above your belly button, or the thinnest part of your torso) and pin to taper it in- just make sure that when you have it pinned, the tee isn’t stretching flat or pulling against you for that weekender, effortless vibe- it should still hang slightly loose and not skin tight.
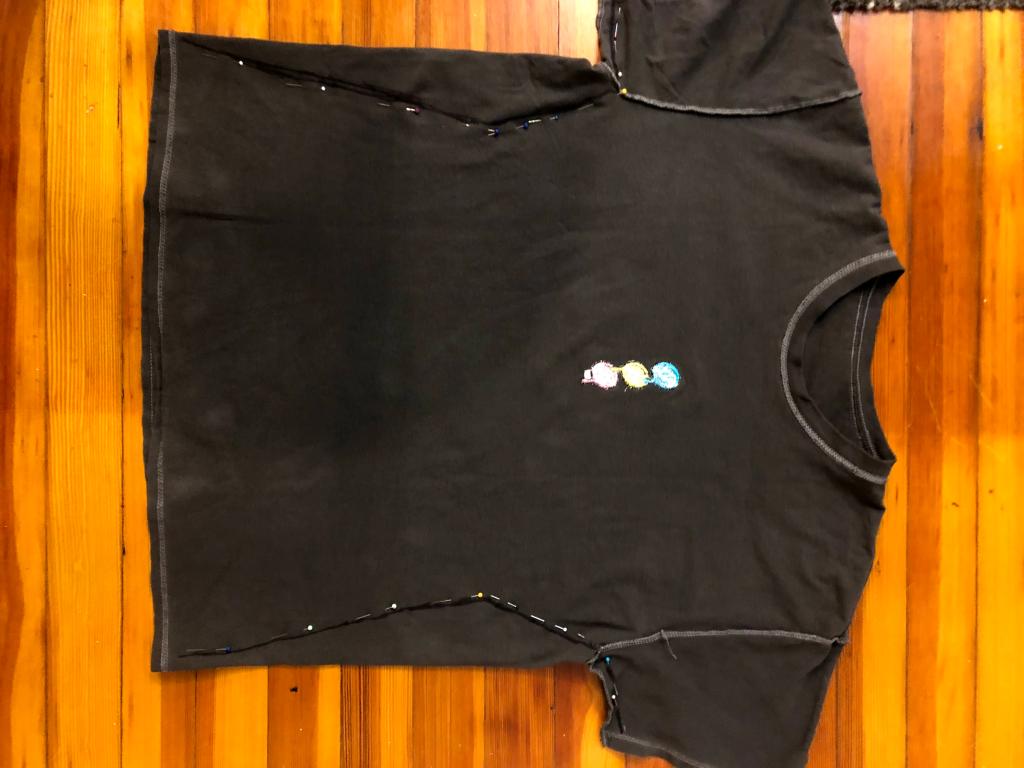
Then I like to take the shirt off and sew all the seams we pinned- I sew each sleeve from the seam in the armpit to the end of the sleeve first, then I go from the seam in the armpit down the sides of the body of the shirt, all the way to the bottom.
As far as the length of the shirt goes, I suggest that the middle should hit about an inch or less below the zipper of your jeans and the sides taper up to sit at or just above the widest part of your hips.
For the sleeve-length, I like them to hit at the halfway point between my elbow and my shoulder, which hides the widest part of my bicep. I don’t like when my tees have the too-short sleeve that makes my arm look bigger and less toned than it is. A slightly longer sleeve is just a little bit more flattering to me than a baby tee sleeve. Also, I usually cuff them twice and sew the cuff in place on the outside so you can see it’s cuffed, rather than just hemming it up, but that’s just a style choice I like.
There you have it, the Hollywood Magic of the Perfect Tee, demystified.
After all that, you had better have a friend pose as a Paparazzi and snap some “On the Go” photos of you. But if you want the effect without so much work, even employing one or two of these alterations to a tee shirt would give it that “custom, effortlessly cool look” that celebrities sell us in every image we see.